
SFM Compile: Complete Guide to Compiling Models in Source Filmmaker

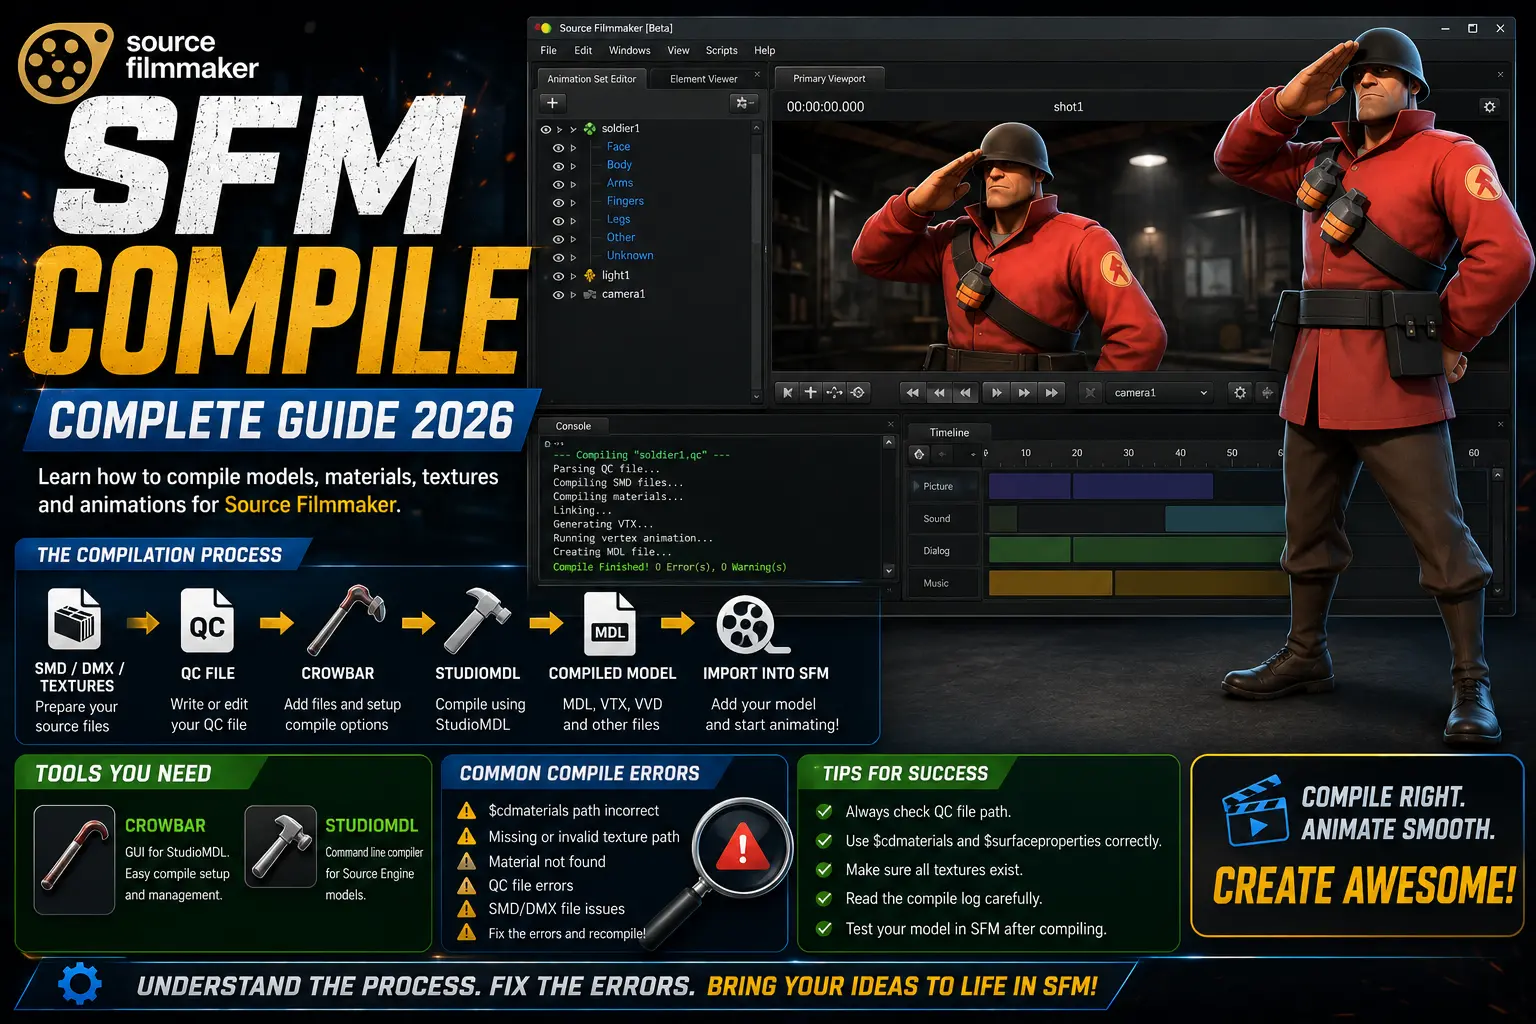
SFM Compile: The Quick Answer
SFM compile is the process of converting a custom 3D model and its supporting data into Source Engine files that Source Filmmaker can load. A typical workflow starts with a model exported from Blender, Maya, or another compatible 3D application, followed by a QC file that tells StudioMDL how the asset should be built. Crowbar can provide the graphical interface for running the compiler, while StudioMDL performs the actual model compilation.
Read Also: Snapjotz.com Review 2026
The final output commonly includes files such as MDL, VVD, and VTX, with a PHY file used when physics or collision data is compiled. Textures and materials are handled separately through Source’s VTF and VMT system.
If you’ve ever seen a model refuse to load, turn bright pink, lose its animations, appear at the wrong scale, or fail during compilation, the cause is usually somewhere in the export, QC, material path, or compiler setup.
The good news? You don’t need to memorize hundreds of Source commands to get started. Once you understand what each stage does, SFM compile becomes a repeatable workflow rather than a guessing game.
Exact compiler behavior and supported formats can vary between Source branches and tool versions. Always use the compiler associated with the game or Source branch you are targeting.
SFM Compile in 30 Seconds
| Question | Answer |
|---|---|
| What is SFM compile? | Converting source model assets into files Source Filmmaker can load |
| What compiler is commonly used? | StudioMDL, often managed through Crowbar |
| What is a QC file? | A text-based instruction file that tells the compiler how to build the model |
| What formats are commonly exported? | SMD and DMX |
| What is MDL? | The primary compiled Source model file |
| What is VVD? | A compiled file containing vertex data |
| What is VTX? | Compiled model rendering/optimization data |
| What is PHY? | Collision and physics data when required |
| What are VTF files? | Source texture files |
| What are VMT files? | Material definition files |
| Can Blender export directly to MDL? | Not as a normal native export; an intermediate Source format and compiler are generally used |
| Do I need Crowbar? | Not strictly, but it makes the compilation workflow much easier |
| Why does a model turn pink? | Usually because Source cannot locate the expected material or texture files |
What Does SFM Compile Actually Do?
Source Filmmaker does not simply take a Blender, Maya, or 3ds Max scene and treat it like a modern universal 3D asset.
Instead, Source uses its own model pipeline. StudioMDL is the command-line compiler responsible for turning intermediate model data into the binary .mdl format used by the Source engine.
That means your workflow normally looks something like:
Create Model → Export SMD/DMX → Prepare Materials → Create QC → Run StudioMDL/Crowbar → Generate Compiled Files → Place Assets in SFM → Test
Think of the QC file as a build recipe.
Your exported mesh is the raw ingredient. Your textures are another ingredient. The QC file tells the compiler how everything should be assembled.
Once compilation succeeds, Source Filmmaker can use the resulting asset inside animation projects, posters, cinematics, and scenes.
Why Do You Need to Compile Models for SFM?
One of the most common beginner mistakes is assuming that an exported FBX, OBJ, or Blender file can simply be dropped into Source Filmmaker.
That’s generally not how the Source model pipeline works.
A custom model needs to be prepared in a format understood by the Source toolchain before SFM can use it as a normal model asset.
Compilation becomes relevant when you are:
- Creating a custom character
- Building a custom prop
- Importing a model from another application
- Porting compatible assets from another Source-based project
- Adding custom animations
- Creating collision or physics data
- Modifying an existing compiled model
- Preparing an asset for a larger SFM project
For example, a character created in Blender may contain the mesh, armature, UVs, materials, and animations. Those elements still need to be translated into a Source-compatible workflow before the finished character can behave correctly inside SFM.
When Is SFM Compilation Required?
Custom Characters
If you’ve built your own character in Blender, Maya, or 3ds Max, you’ll generally need to export the relevant geometry and animation data and compile it through the Source pipeline.
The process becomes especially important when the character includes:
- A skeleton
- Skin weights
- Facial controls
- Multiple animations
- Attachments
- Physics
- Multiple materials
Custom Props
Props such as:
- Weapons
- Furniture
- Vehicles
- Signs
- Tools
- Buildings
- Decorative objects
- Environmental assets
can all require compilation before they can be used as proper Source models.
Porting Existing Assets
SFM creators also work with assets originating from other Source games and projects.
Common examples include:
- Team Fortress 2
- Half-Life 2
- Counter-Strike: Source
- Left 4 Dead
- Garry’s Mod
However, sharing the Source engine does not automatically mean that every model is ready to work in every Source-based application.
Different branches, file structures, shaders, animations, and compiler versions can introduce compatibility problems.
Editing Existing Models
Changing an existing asset can also lead back to the compile pipeline.
For example, you might modify:
- Geometry
- Bones
- Textures
- Animations
- Collision
- Materials
- Bodygroups
The exact steps depend on the modification, but once the underlying source asset has changed, recompilation is often necessary.
The SFM Compile Pipeline Explained
A useful way to understand the process is to divide it into six stages:
- Build or edit the model
- Export Source-compatible files
- Prepare textures and materials
- Create the QC file
- Compile with StudioMDL, usually through Crowbar
- Load and test the finished model in SFM
Each stage depends on the previous one.
If your model exports incorrectly, the QC cannot fix the mesh.
If the QC points to the wrong file, the compiler cannot magically find it.
If the material path is wrong, a successful model compilation can still result in pink textures.
That is why troubleshooting becomes easier when you think about the entire pipeline instead of treating every error as a separate problem.
Step 1: Create or Clean Up Your Model
Most custom SFM models begin in a 3D application such as:
- Blender
- Autodesk Maya
- 3ds Max
Before exporting, clean the scene as much as possible.
Check the following:
- Mesh geometry
- Bone hierarchy
- Armature
- UV maps
- Materials
- Object names
- Scale
- Rotation
- Origin
- Skin weights
- Animation data
Apply Your Transforms
Unapplied transforms can cause unexpected results after export.
Depending on the software and workflow, make sure the model’s scale and rotation are configured correctly before exporting.
A character that looks perfectly normal in Blender can become tiny, enormous, rotated, or otherwise incorrect after compilation if the export setup is inconsistent.
Clean the Geometry
Remove unnecessary:
- Vertices
- Faces
- Duplicate objects
- Hidden geometry
- Unused materials
- Unwanted modifiers
You don’t need to make the model unnecessarily complicated just because the original scene can handle it.
A clean source asset is easier to compile and much easier to troubleshoot.
Check the Skeleton
For animated characters, inspect:
- Bone names
- Parent-child relationships
- Bone orientation
- Skin weights
- Deformation
- Animation compatibility
A broken skeleton can produce much more complicated problems than a simple missing texture.
Step 2: Export the Model as SMD or DMX
Once the model is ready, you need an intermediate format that fits the Source workflow.
The two formats you’ll encounter most often are SMD and DMX.
SMD
SMD stands for Studio Model Data.
It has been used throughout the Source ecosystem for many years and remains popular because it is relatively straightforward and widely supported.
SMD is commonly used for:
- Meshes
- Skeletons
- Animation sequences
- Simple Source workflows
Its biggest advantage for beginners is familiarity.
There are also many older tutorials and community examples based around SMD.
DMX
DMX is another Source asset format and can be useful for more advanced workflows, particularly where animation and richer asset information are involved.
It is commonly encountered in newer Source workflows and can be useful when the chosen tools support it.
SMD vs. DMX
| Factor | SMD | DMX |
|---|---|---|
| Simplicity | High | Moderate |
| Community tutorials | Extensive | Good |
| Beginner-friendly | Usually | Can be more complex |
| Animation workflows | Supported | Strong support |
| Older Source workflows | Excellent | Depends on branch/tool |
| Advanced projects | Useful | Often useful |
| Troubleshooting | Relatively straightforward | Can require more tool knowledge |
Which One Should You Choose?
If you’re completely new to Source Filmmaker, SMD is usually a sensible starting point because the workflow is easy to understand and widely documented.
DMX can make sense when your specific project or export tools benefit from it.
Don’t switch between formats simply because a compile fails. If the actual problem is a broken path, bad QC command, or invalid material reference, changing SMD to DMX won’t solve it.
Step 3: Prepare Your Textures and Materials
A model is more than geometry.
It also needs materials and textures.
Source commonly uses two important file types:
VTF
VTF stands for Valve Texture Format.
It stores the texture image used by the Source material system.
Textures may originate as PNG, TGA, or another image format and then be converted into VTF for the Source workflow.
VMT
VMT stands for Valve Material Type.
A VMT describes how Source should use a material and which texture resources it should reference.
For example, a VMT can define things related to:
- Base textures
- Shaders
- Transparency
- Surface properties
- Material behavior
The exact shader setup depends on the asset.
Why Material Paths Matter
One of the most recognizable SFM problems is the pink-and-black checkerboard texture.
That usually means Source can load the model but cannot resolve the expected material or texture correctly.
Common causes include:
- Incorrect VMT location
- Missing VTF file
- Incorrect
$basetexture - Wrong material name
- Incorrect
$cdmaterialspath - Renamed folders
- Inconsistent capitalization or paths
Community troubleshooting commonly points back to matching material names and correct paths when models load without their expected textures.
A model can therefore compile successfully and still look completely wrong.
Compilation success does not automatically equal a correctly installed asset.
Step 4: Create the QC File
The QC file is the instruction sheet for StudioMDL.
It does not contain your entire model. Instead, it tells the compiler what files to use and how the final model should be constructed.
A QC file can define things such as:
- Model output name
- Mesh files
- Material directories
- Animation sequences
- Collision models
- Physics settings
- Surface properties
- LOD behavior
- Bodygroups
- Other model-specific compiler instructions
Valve’s StudioMDL documentation describes the compiler as the tool that converts intermediate model data into the binary MDL format used by Source.
A Simple QC Structure
A basic concept might look like:
$modelname "custom/character.mdl"
$body "body" "character.smd"
$cdmaterials "models/custom"
$sequence idle "idle.smd"
This is only a simplified example. The correct commands and paths depend on the model and Source branch.
Think of QC as a Build Recipe
A useful mental model is:
Model file = what you built
Texture/material files = how it looks
QC file = how Source should assemble it
Once you think about it this way, QC files become much less intimidating.
Common QC Problems
Typical mistakes include:
- Incorrect quotation marks
- Wrong mesh filename
- Incorrect material directory
- Missing animation file
- Wrong sequence name
- Invalid output path
- References to files that no longer exist
- Incorrect collision setup
One incorrect path can stop the compilation process.
Step 5: Compile the Model With Crowbar or StudioMDL
This is where the actual model build takes place.
What Is StudioMDL?
StudioMDL is the actual Source model compiler.
It is a command-line tool that takes the intermediate files and QC instructions and creates the compiled model data.
What Is Crowbar?
Crowbar is a community-developed graphical tool that makes Source model compilation easier to manage.
Instead of manually working with command-line parameters for every build, Crowbar gives you a graphical workflow for tasks such as:
- Selecting QC files
- Choosing the compiler
- Configuring paths
- Starting compilation
- Reviewing compiler output
- Troubleshooting errors
This is why many SFM creators prefer Crowbar when learning the process.
Crowbar vs. StudioMDL
They aren’t really competing products.
| Tool | Main role |
|---|---|
| Crowbar | Graphical interface and Source model utility |
| StudioMDL | Actual model compiler |
| QC | Instructions supplied to the compiler |
So, when you click compile in Crowbar, StudioMDL is still doing the underlying compilation work.
Step 6: Inspect the Compile Log
Don’t immediately close the compiler window when it finishes.
The log is one of your most useful debugging tools.
Look for:
- Missing files
- Invalid paths
- Syntax errors
- Unsupported commands
- Missing materials
- Animation errors
- Physics warnings
- Duplicate definitions
- Compiler warnings
The first meaningful error is often more useful than the final line saying that the compilation failed.
A Better Debugging Habit
Don’t change five things at once.
Instead:
- Read the first real error.
- Identify the file involved.
- Fix one issue.
- Compile again.
- Check the new log.
- Repeat.
This makes troubleshooting much easier because you’ll know which change actually fixed the problem.
Step 7: Check the Compiled Files
A successful build normally produces the files required by the Source model system.
Common output files include:
.mdl.vvd.vtx.phywhen physics data is generated
The exact output can depend on your model and compiler setup.
What Each File Does
| File | Role | Typical status |
|---|---|---|
| QC | Compilation instructions | Required |
| SMD | Intermediate mesh/skeleton/animation data | Common |
| DMX | Alternative Source asset format | Optional depending on workflow |
| MDL | Main compiled model | Required |
| VVD | Vertex data | Generated |
| VTX | Rendering/optimization data | Generated |
| PHY | Physics/collision data | Optional |
| VMT | Material definition | Required for materials |
| VTF | Texture data | Required for textured materials |
The compiled model system depends on multiple files working together. If one supporting file is missing or placed incorrectly, the model may fail to load or behave incorrectly.
Step 8: Load the Model in Source Filmmaker
Compilation is not the final step.
You still need to test the asset inside SFM.
Check:
- Does the model appear?
- Are textures visible?
- Are materials behaving correctly?
- Is the model the correct size?
- Are bones moving correctly?
- Do animations play properly?
- Are attachments in the correct positions?
- Does physics behave as expected?
- Does the model deform correctly?
A model can pass compilation and still fail during actual use.
That is normal.
Experienced creators generally expect at least one test-and-fix cycle before considering an asset finished.
Tools You Need for SFM Compile
You don’t need an enormous software collection to compile a basic Source Filmmaker model.
Source Filmmaker
SFM is the environment where you’ll eventually use the compiled asset.
It provides the animation, scene-building, camera, lighting, and rendering workflow.
Crowbar
Crowbar is one of the most useful community tools for Source model workflows.
It provides a graphical interface around tasks that can otherwise involve command-line tools and manual configuration.
Blender Source Tools
If you’re using Blender, Source export tools can help produce SMD or DMX assets suitable for the Source workflow.
The exact exporter and supported features can vary with the Source branch and Blender version.
[VERIFY] Check the current exporter documentation before relying on a specific feature or Blender version.
Source SDK / Source Toolchain
The Source development tools provide utilities used by Source-based workflows, including StudioMDL depending on the particular game or branch.
The location of the compiler can differ between Source games and installations, so don’t blindly copy a path from an old tutorial.
VTF Editing Software
A VTF-compatible texture utility is useful when converting image textures into Valve’s texture format.
This is particularly important when creating custom materials.
GCFScape
GCFScape can be useful for inspecting and extracting resources from certain Source game archives.
Use it responsibly and respect the licensing and distribution rules for assets you work with.
Notepad++
A lightweight text editor is useful for QC files.
Syntax highlighting, search, multiple tabs, and simple editing make it easier to work with longer QC scripts.
Image Editing Software
You may also use:
- Photoshop
- GIMP
- Krita
for preparing textures before conversion.
Understanding the Files Used in SFM Compile
Knowing what each file does can save hours of troubleshooting.
QC
The QC file contains instructions for StudioMDL.
Common problem: incorrect syntax or paths.
SMD
SMD is an intermediate Source model format that can store geometry, skeletal information, or animation data depending on how it is exported.
Common problem: incorrect export, naming, scale, or skeleton setup.
DMX
DMX is another intermediate Source format that can contain model and animation information.
Common problem: tool or branch compatibility.
MDL
MDL is the primary compiled model file that Source loads.
Common problem: failed compilation or incompatible compiled output.
VVD
VVD stores compiled vertex information associated with the model.
Common problem: missing or mismatched compiled files.
VTX
VTX contains additional compiled model rendering and optimization information.
Common problem: mismatched or incomplete compiled output.
PHY
PHY contains collision and physics information when physics data is generated.
Common problem: incorrect collision behavior or missing physics output.
VTF
VTF contains texture data.
Common problem: missing texture or incorrect conversion.
VMT
VMT describes material behavior and references textures.
Common problem: pink or missing materials.
Step-by-Step: How to Compile an SFM Model
Now that the individual pieces make sense, let’s combine them into one practical workflow.
1. Prepare Your Model
Before opening Crowbar, make sure the model itself is clean.
Check:
- Scale
- Rotation
- Origin
- Bone structure
- Mesh quality
- UVs
- Materials
- Naming
- Skin weights
Don’t start troubleshooting the compiler when the exported model itself is broken.
2. Export the Source Files
Export the mesh and, if required, animations into SMD or DMX.
Keep the exported files in an organized project folder.
For example:
MyCharacter/
├── source/
├── animations/
├── materials/
├── qc/
└── compiled/
Your exact folder structure can be different. The important thing is consistency.
3. Prepare the Materials
Convert your textures to the format required by your Source workflow.
Create the appropriate VMT files and ensure the material references match the names used by the model.
This is where many pink-texture problems begin.
4. Write the QC File
Start with a simple QC.
Don’t add every advanced feature immediately.
First prove that the basic mesh can compile.
Then add:
- Animations
- Collision
- Bodygroups
- Attachments
- LODs
- Additional features
one at a time.
5. Open Crowbar
Select the compile function.
Then:
- Choose the correct Source Filmmaker game directory.
- Select the QC file.
- Confirm the StudioMDL compiler path.
- Choose the appropriate output configuration.
- Start compilation.
- Watch the log.
The exact Crowbar interface can vary between releases.
[VERIFY] Always confirm the compiler path and SFM directory against your current installation rather than copying an old tutorial’s path.
6. Read the Log
If the compile fails, don’t panic.
Find the first meaningful error.
For example:
- Can’t open file
- Material not found
- Invalid command
- Missing sequence
- Model has too many vertices
- Unable to load collision model
Fix that issue before changing anything else.
7. Check the Output
Look inside the expected model directory.
Make sure the compiled files actually exist.
A compilation message alone isn’t enough.
8. Test in SFM
Open Source Filmmaker and load the model.
Check geometry, materials, animation, scale, bones, and physics.
9. Refine
If something is wrong:
Edit → Export → Compile → Test
Repeat until the asset behaves correctly.
That is the normal SFM development cycle.
SMD vs. DMX: Which Should You Use?
This question comes up constantly.
SMD Is a Good Starting Point
SMD is a practical choice if you:
- Are new to Source
- Want a straightforward workflow
- Are following older tutorials
- Need a simple prop
- Want easier troubleshooting
Its long history in Source workflows also means there is plenty of community knowledge around it.
DMX Can Make Sense for Advanced Workflows
DMX may be preferable when:
- Your exporter supports it well
- Your project uses more complex animation data
- You are comfortable with Source tools
- The target Source branch expects or benefits from it
Practical Recommendation
Don’t choose the format based solely on which one sounds newer.
Choose the format supported reliably by your exporter, compiler, Source branch, and project.
If you’re learning from scratch, SMD is often easier to understand.
If you already know the Source pipeline, DMX may offer advantages for particular projects.
Crowbar vs. StudioMDL
Another common beginner question is whether Crowbar or StudioMDL is “better.”
The comparison is slightly misleading.
StudioMDL
StudioMDL is the compiler.
Its job is to process your QC instructions and intermediate model data into compiled Source model files.
Advantages
- Core Source compilation tool
- Direct compiler workflow
- Suitable for automated or command-line workflows
- Produces the compiled model output
Disadvantages
- Less beginner-friendly
- Command-line oriented
- Path configuration can be confusing
- Error messages may feel intimidating initially
Crowbar
Crowbar provides a more accessible interface for Source model tasks.
Advantages
- Easier setup
- Graphical interface
- Compiler selection
- QC selection
- Log visibility
- Helpful for beginners
Limitations
Crowbar cannot repair a broken model automatically.
It cannot fix:
- Bad geometry
- Incorrect bone weights
- Wrong material paths
- Broken QC syntax
- Missing files
- Invalid animations
Best Approach
For most beginners:
Use Crowbar to manage the process and learn what StudioMDL is actually doing underneath.
That combination gives you convenience without hiding the fundamentals.
QC Files Explained Without the Headache
QC files can look intimidating because they use Source-specific commands.
But the basic concept is simple.
A QC file tells the compiler:
What model should I build?
Where is the mesh?
Where are the materials?
Which animations should be included?
Should I create collision data?
Where should the compiled model go?
Common QC Commands
Some commands you’ll encounter include:
$modelname$body$cdmaterials$sequence$surfaceprop$collisionmodel$lod
You don’t need to learn every command before your first successful compile.
Start small.
Keep QC Files Readable
Use:
- Consistent indentation
- Clear comments
- Predictable filenames
- Logical folder paths
- Simple structure
A messy QC file becomes difficult to debug.
A Useful Beginner Strategy
Create a minimal working model first.
Once that works, add one feature.
Compile again.
Then add the next feature.
This is much faster than trying to debug a 200-line QC file that contains five unrelated problems.
The Most Common QC Failure Patterns
1. Broken Paths
The compiler cannot locate the referenced file.
Fix: Check the exact folder and filename.
2. Syntax Errors
A missing quote, bracket, or incorrect command can stop compilation.
Fix: Compare the command against reliable documentation for your Source branch.
3. Missing Files
The QC references an SMD, DMX, animation, or collision file that isn’t present.
Fix: Confirm the file exists and the name matches exactly.
4. Incorrect Mesh Names
The QC points to a different name than the exported file.
Fix: Keep naming consistent throughout the project.
5. Too Much Complexity
You add physics, multiple sequences, bodygroups, and LODs before the basic model works.
Fix: Strip the QC back to the simplest working configuration.
Troubleshooting Common SFM Compile Problems
Why Does My Compile Fail Immediately?
Check:
- QC syntax
- File paths
- Missing SMD/DMX files
- Compiler configuration
- Incorrect game directory
If the compiler stops before doing meaningful work, the QC or environment configuration is a good place to start.
Why Is My Model Pink or Black?
The model may have compiled successfully, but Source cannot locate its materials or textures.
Check:
- VMT location
- VTF location
$cdmaterials$basetexture- Material names
- Folder structure
Community troubleshooting repeatedly identifies incorrect material paths and VMT/VTF relationships as common causes of missing textures.
Why Is the Model Invisible?
Possible causes include:
- Incorrect scale
- Invalid geometry
- Wrong body reference
- Origin problems
- Material issues
- Export problems
- Incorrect model configuration
Try inspecting the compiled model with an appropriate Source model viewer and checking the compiler output.
Why Is My Animation Broken?
Check:
- Bone names
- Bone hierarchy
- Animation export
- Sequence names
- Frame ranges
- QC references
- SMD/DMX compatibility
If the model itself works but the animation doesn’t, concentrate on the animation export and $sequence definitions rather than rebuilding the entire asset.
Why Doesn’t Physics Work?
Check:
- Whether a PHY was generated
- Collision mesh
$collisionmodel- Physics-related QC settings
- Whether the collision geometry is valid
Physics problems are separate from many visual model problems, so don’t assume that fixing a texture path will solve them.
How to Read an SFM Compile Error Log
A compiler log can look overwhelming at first.
Don’t read it like a normal article.
Read it like a diagnostic report.
Look for:
ERROR
WARNING
cannot find
cannot load
missing
invalid
unknown
failed
Then identify the file or command mentioned nearby.
The First Error Usually Matters Most
Suppose the log contains ten errors.
The final error may simply be a consequence of the first failure.
Fix the first meaningful issue, compile again, and see what remains.
This is much more efficient than making random changes.
How to Improve SFM Compile Speed
Compilation speed matters more as your projects become larger.
You can reduce unnecessary work by keeping your project organized.
Keep Source Files Clean
Remove assets you aren’t actually using.
Test Small Changes
If you changed one animation, don’t rebuild everything mentally.
Test the smallest useful change.
Reuse Working QC Templates
A proven QC template can save significant time.
Instead of starting from zero for every prop, create a clean base and modify only the necessary sections.
Use Fast Storage
A modern SSD can reduce file-access delays when you’re working with large projects.
However, organization matters too.
A messy project can waste more time than a slower computer because you spend your time searching for files and repeating failed builds.
Advanced SFM Compile Techniques
Once the basic workflow works, you can start adding more sophisticated features.
Custom Collision Models
Custom collision geometry gives you more control over how a model interacts with physics.
This is useful for props that need predictable physical behavior.
Level of Detail
LOD systems can provide simpler versions of a model for situations where full detail is unnecessary.
This becomes more relevant for large scenes containing many assets.
Bodygroups
Bodygroups can allow one model to contain optional components.
They are useful for:
- Clothing variations
- Accessories
- Modular props
- Character variations
Animation Sequences
Animated models require careful naming and export management.
Keep animation files organized and use predictable sequence names.
Material Overrides
Material changes can provide visual variations without requiring an entirely separate model for every appearance.
Workshop Packaging
If you’re preparing assets for sharing, organization becomes even more important.
A clean package should contain the correct models, materials, supporting files, and folder structure.
[VERIFY] Workshop packaging requirements can depend on the specific Source game or distribution method, so confirm the current requirements for your target platform.
How Experienced SFM Creators Approach Compilation
The biggest difference between beginners and experienced creators isn’t necessarily modeling ability.
It’s workflow discipline.
Experienced users tend to:
- Keep reusable QC templates
- Make backups
- Change one thing at a time
- Keep source and compiled assets separated
- Maintain consistent naming
- Read compiler logs
- Test assets before production
- Document settings that work
- Keep textures organized
- Avoid unnecessary complexity
That approach turns compilation into a predictable development process.
Real-World SFM Compile Example
Imagine you’re creating a custom character in Blender for a short SFM cinematic.
Your workflow might look like this:
1. Build the Character
Create the mesh, skeleton, materials, and animations in Blender.
2. Clean the Scene
Apply the appropriate transforms, remove unnecessary objects, check weights, and verify the armature.
3. Export
Export the mesh and animations using SMD or DMX.
4. Prepare Textures
Convert the required textures into VTF files and create VMT material definitions.
5. Create the QC
Tell StudioMDL:
- What the model is called
- Which mesh to use
- Where the materials are
- Which animations to include
- Whether physics should be generated
6. Compile
Open Crowbar and run the QC through the appropriate StudioMDL compiler.
7. Read the Log
Check for warnings and errors.
8. Inspect the Output
Confirm that the expected MDL, VVD, VTX, and any required PHY files were generated.
9. Load in SFM
Open the model in Source Filmmaker.
10. Test
Check:
- Materials
- Bones
- Animations
- Scale
- Attachments
- Physics
11. Fix and Repeat
If something isn’t right, go back to the relevant stage.
This is what real SFM compilation usually looks like.
The first successful compile is often only the beginning.
Common Mistakes Beginners Make With SFM Compile
1. Using the Wrong Folder Structure
Scattered source files make path errors much more likely.
Better approach: Keep your QC, source files, textures, and compiled output organized.
2. Forgetting Transforms
The model looks fine in Blender but imports incorrectly into SFM.
Better approach: Check scale and rotation before export.
3. Incorrect Material Paths
This is one of the most common causes of pink textures.
Better approach: Make sure the VMT location, VTF location, $cdmaterials, and $basetexture references all agree.
4. Adding Too Many Features Too Early
Trying to compile a character with animations, physics, LODs, bodygroups, and multiple materials on the first attempt creates too many possible failure points.
Better approach: Start with the simplest working model.
5. Ignoring the Compiler Log
Closing the log immediately throws away valuable diagnostic information.
Better approach: Read the first meaningful error.
6. Renaming Files at the Last Minute
Changing a mesh or animation name without updating the QC creates broken references.
Better approach: Decide on a naming system early.
7. Assuming Compilation Success Means the Model Is Finished
A successful compile only proves that the compiler produced output.
It doesn’t prove that:
- Materials are correct
- Animations work
- Physics behave properly
- Scale is right
- Attachments are positioned correctly
Always test the asset in SFM.
Best Practices for Reliable SFM Compilation
Build Reusable QC Templates
Once you’ve successfully compiled a prop or character, save the working QC as a template.
This gives you a reliable starting point for future projects.
Test Incrementally
Instead of making ten changes before compiling:
Change → Compile → Test
That makes errors much easier to identify.
Keep Source and Output Separate
For example:
Project/
├── source/
├── textures/
├── qc/
└── compiled/
You can adapt this structure to your own workflow.
Keep Backups
Before making major changes to:
- Skeletons
- Animations
- Physics
- QC files
- Material structures
make a backup.
Use Descriptive Names
Names such as:
character_idle.smd
character_walk.smd
character_collision.smd
are much easier to understand than:
final2_new_REAL.smdClear naming is a small habit that makes large projects much easier to manage.
SFM Compile Readiness Checklist
Before pressing Compile, check:
- Model geometry is clean
- Transforms are configured correctly
- Skeleton is valid
- Bone names are consistent
- UVs are correct
- Textures are prepared
- VTF files exist where expected
- VMT files reference the correct textures
- QC syntax has been checked
- QC paths are correct
- SMD/DMX files exist
- Animation references are valid
- Collision files are prepared if required
- Crowbar is using the intended compiler
- StudioMDL path is valid
- Output directory is correct
- Source files are backed up
- Compile log is available for review
If most of these boxes are checked, you’ve eliminated a large number of avoidable problems.
Frequently Asked Questions About SFM Compile
What does SFM compile mean?
SFM compile is the process of converting model, animation, and related source assets into formats that Source Filmmaker can load. A typical workflow uses SMD or DMX files, a QC instruction file, and StudioMDL, often operated through Crowbar.
Can I compile a model directly from Blender?
Not directly into the final Source MDL in the usual workflow.
Blender generally needs to export the model through a Source-compatible intermediate format such as SMD or DMX. The QC file then tells StudioMDL how to build the compiled asset.
Do I need Crowbar to compile an SFM model?
No, Crowbar is not the compiler itself. StudioMDL performs the actual model compilation. Crowbar provides a convenient graphical workflow for running and managing the compiler.
For beginners, however, Crowbar can make the process considerably easier.
What is a QC file in SFM?
A QC file is a plain-text set of instructions for the Source model compiler.
It can define the model name, mesh files, material directories, animations, collision settings, and other compilation behavior.
What is the difference between SMD and DMX?
SMD is a long-established Source intermediate format that is relatively straightforward, while DMX is another Source format that can provide more flexibility for certain model and animation workflows.
The best choice depends on your exporter, target Source branch, and project requirements.
Why is my SFM model pink?
A pink-and-black checkerboard usually means Source cannot find the expected material or texture.
Check:
- VMT location
- VTF location
$cdmaterials$basetexture- Material names
- Folder structure
Incorrect material paths are a common cause of this problem.
Why won’t my model compile?
Common causes include:
- Incorrect QC syntax
- Missing SMD or DMX files
- Invalid paths
- Incorrect compiler configuration
- Broken animation references
- Unsupported commands
- Invalid collision data
Start with the compiler log and locate the first meaningful error.
How can I reduce compile times?
Keep your project organized, remove unnecessary geometry, avoid rebuilding unused assets, test changes incrementally, and reuse stable QC templates.
For larger projects, fast storage can also help with file-heavy workflows.
Can I compile animations separately?
Animation sequences can be defined separately in the QC workflow, and the exact setup depends on your model structure, exported files, and Source branch.
If an animation is not working, check its export, bone structure, filename, sequence definition, and frame range.
What files are generated after compiling a Source model?
The most common compiled model files include MDL, VVD, and VTX. A PHY file may also be generated when physics or collision data is included.
The exact output depends on the model and compilation configuration.
What causes the pink-and-black checkerboard texture?
The checkerboard usually indicates a missing or incorrectly referenced material or texture. Check the VMT, VTF, material directory, texture path, and material naming before recompiling the entire model.
Is StudioMDL the same thing as Crowbar?
No.
StudioMDL is the model compiler, while Crowbar is a graphical utility that can run and manage Source compilation tasks. StudioMDL performs the actual conversion into compiled model data.
Do I need VTF and VMT files?
For a textured Source model, you generally need the appropriate VTF texture files and VMT material definitions.
The VMT tells Source how to use the material and references the relevant texture resources.
Why does my model compile but not appear in SFM?
A successful compilation does not guarantee correct installation.
Check:
- Model output location
- MDL/VVD/VTX files
- Material directories
- SFM game folders
- Model path
- Compiler output
- Model browser filters
Also confirm that you are looking in the correct SFM game/mod directory.
Can I use models from other Source games in SFM?
Sometimes, but compatibility is not guaranteed.
Source games can use different branches, assets, shaders, skeletons, animations, and tool versions. A model from another Source title may require changes or recompilation before it behaves correctly in SFM.
Is SFM compile difficult for beginners?
The first compile can feel confusing because several file types and tools are involved.
Once you understand the basic relationship between SMD/DMX → QC → StudioMDL/Crowbar → MDL/VVD/VTX → SFM, the process becomes much easier to follow.
Conclusion: Mastering SFM Compile
SFM compile is the bridge between a custom 3D asset and a model that Source Filmmaker can actually use.
The process may look complicated at first because it involves several different files and tools. But each component has a specific job.
Your 3D application creates the model.
SMD or DMX carries the intermediate asset data.
VTF and VMT handle textures and materials.
QC tells the compiler how everything should be assembled.
StudioMDL performs the model compilation.
Crowbar makes that workflow easier to manage.
Finally, MDL, VVD, VTX, and optionally PHY become part of the compiled asset that SFM can load.
The most reliable approach is to keep the workflow simple:
Clean model → correct export → organized materials → valid QC → compile → read the log → test in SFM → refine.
Don’t be discouraged by the first failed compile. Source workflows are particularly strict about names, paths, file relationships, and compiler configuration. Once you learn to treat the compile log as a diagnostic tool rather than a wall of confusing text, most problems become much easier to isolate.
For beginners, the best habit is to build one small working model first. Once that works, add animations, physics, bodygroups, LODs, and other advanced features one at a time.
That is how you turn SFM compile from a frustrating technical hurdle into a predictable part of your Source Filmmaker workflow.